Automating your asset pipeline
Disclaimer: The code in this post is written on version 10.1.400.0 of Simplygon. Should you encounter this post running a different version, some of the API calls might differ. However, the core concepts should still remain valid.
Introduction
At Simplygon, we are committed to providing you with powerful tools that optimize your content and streamline your workflow. Our SDK serves as an automation toolkit, giving you the ability to create efficient and effective pipelines that take your content to the next level. Whether you're working with low-range PCs, mobile devices, or previous-generation consoles, our tools allow you to easily adapt your assets for optimal performance, while also preparing them for next-generation hardware and delivering the best visual experience for your players.
In this post, we will show you how to take small steps towards a more automated asset pipeline with Simplygon, turning new platforms into opportunities, not problems.
Getting started with automation
When working with Simplygon, it is common to focus on reducing manual labor by plugging in our solution where an artist would traditionally do a lot of manual optimization work. While this can save a lot of time, there is even more value to be gained by taking a step back and looking at your entire pipeline.
Consider the following questions:
- What happens if we need to optimize our content even more just before shipping to achieve our target frame rate?
- Rather than pushing most of the optimization work towards the end of production, wouldn't it be better to do it continuously? This way, we would have a good idea of the memory and performance budgets all the time.
- What if the game is super-successful and we decide to move the game to more platforms?
- Wouldn't it be better to review the optimized content on the target platform, in-game play, rather than spending cycles before it goes in?
If you decide to review your content production pipelines, you will probably realize that it is a massive undertaking. But, almost all large problems can be broken down into small steps.
Step 1 - Get some automation up and running
The most logical place to start automating content optimization is with LOD chains. Rather than an artist using Simplygon to produce the LODs and check them into the repository, you can automatically create them as the source model is checked in. This gives you the ability to fine-tune your LOD strategy as the game is being produced, without having to go through all content and add another LOD step.
The goal at this stage should be to get the pipeline up and running, not to focus on the results. Once that's done, you can worry about getting everything right.
Step 2 - Refine
Once you have the automatic LOD pipeline up and running, you can start looking at refining the results. Perhaps you want to spend some time deciding on the optimal LOD strategy for your game. You can run a few different scenarios and check what that does to performance and memory. For example:
- Can you afford six LOD steps memory-wise, and is there any noticeable gains in performance?
- What about merging materials on the third LOD stage, does that give you any gains?
You should also refine the quality of the optimized objects by playing around with the Simplygon settings, perhaps using specific presets per object class so that you have more levers to play with.
Step 3 - Tackle another challenge
After you've got the LOD chain pipeline up and running, you can start looking at new challenges, such as:
- Automatic clustering and optimization of objects in your levels.
- Merging materials to simplify shaders for distant objects.
- Hierchical LOD for you large vistas.
- Visibility culling for side scenes
- Tackling foliage
- And much more...
A practical automation example
We're excited that you're interested in exploring automation further. To get you started, we'll walk you through a simple LOD chain example using the Maya integration. First, we'll create a basic LOD pipeline in Maya. Next, we'll use that pipeline in a simple Python script that runs the same pipeline across multiple assets. With this foundation, you can easily extend the script to, for example, check assets in Perforce and run the script as they are checked into the central repository. Once the script is finished, you can simply check the assets into the central repository in the way you prefer to structure your LODs.
Setting the foundation
In Maya, we will use the Simplygon UI to establish an LOD chain for our script. This video demonstrates how to create a basic character pipeline. Before diving into the setup, let's discuss the difference between reducing by percentage and reducing for screen size.
Traditionally, LOD budgets have been set as a percentage of the original asset. For example, LOD 1 would typically be between 50-80% of the original asset, depending on the intended switch point. This method makes sense in a manual optimization scenario as it is more precise than relying on visual quality. However, this can lead to conflicts between art and engineering as art may feel that they've reached the limit, while engineering may argue that the poly count is still too high.
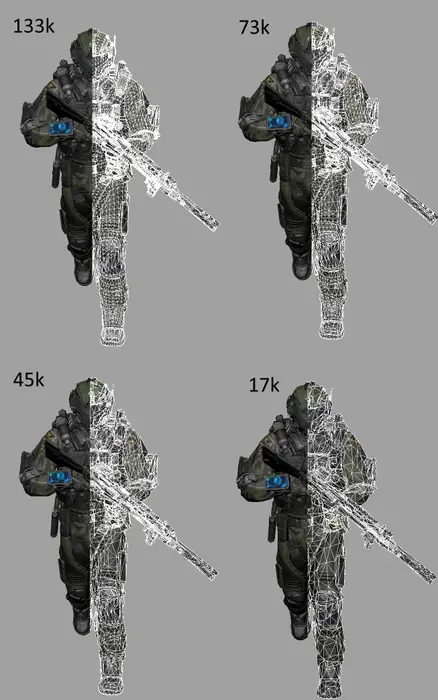
The issue with reducing by percentage is that assets react differently to reduction, as shown in this video. When creating a generic optimization pipeline, it is not ideal to reduce everything in the same way. The asset should dictate how much optimization it can handle. This is what optimizing for screen size enables. To learn more about how screen size works, refer to our documentation on Deviation and size on screen.
Deciding the setting
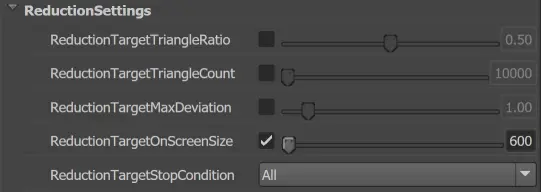
In this example, we will not focus extensively on fine-tuning the settings. Our objective is to establish a functional pipeline. In Maya, we will create a three-step LOD chain for screen sizes 600, 300, and 100 pixels using a cascaded LOD chain. The reduction settings will be configured using different ReductionTargetOnScreenSize values for each step.
Before we decide on the settings we will need to validate them on an asset. This is the results with our test asset.
Scripting the pipeline
While we could take a quick approach and load files that have been exported from the UI, as demonstrated in Optimizing 3D scans with Simplygon, a better approach would be to begin with code right away. This offers more flexibility as we iterate on our asset pipeline, rather than relying on settings files which could become cumbersome.
At the end of this post you can find a script that takes all FBX files located in a folder called input in this example. It then creates an LOD chain similar to the one we identified previously. The output is saved in a sub-folder named lods.
This script can function as a starting point from where you can iterate towards your automatic optmization pipeline.
# Copyright (c) Microsoft Corporation.
# Licensed under the MIT license.

from numbers import Number
from simplygon10 import simplygon_loader
from simplygon10 import Simplygon
import os

# Imports the asset file and returns the scene.
def import_scene(sg: Simplygon.ISimplygon, asset_file: str):
    scene_importer = sg.CreateSceneImporter()
    scene_importer.SetImportFilePath(asset_file)

    import_result = scene_importer.Run()
    if Simplygon.Failed(import_result):
        raise Exception("Import failed of " +
                        asset_file + ": " + str(import_result))

    return scene_importer.GetScene()

# Exports the scene into the specified file
def export_scene(sg: Simplygon.ISimplygon, scene: Simplygon.spScene, export_path: str):
    scene_exporter = sg.CreateSceneExporter()
    scene_exporter.SetExportFilePath(export_path)
    scene_exporter.SetScene(scene)

    export_result = scene_exporter.Run()
    if Simplygon.Failed(export_result):
        raise Exception("Exporting to " + export_path +
                        " failed: " + str(export_result))


# Reduces the asset to the specified screen_size
def reduce(sg: Simplygon.ISimplygon, original_scene: Simplygon.spScene, screen_size: Number):
    reduction_pipeline = sg.CreateReductionPipeline()
    reduction_settings = reduction_pipeline.GetReductionSettings()
    reduction_settings.SetReductionTargets(Simplygon.EStopCondition_Any, False, True, False, False)
    reduction_settings.SetReductionTargetOnScreenSize(screen_size)
    scene = original_scene.NewCopy()
    # Option to speed things up here by distributing across Simplygon Grid.
    reduction_pipeline.RunScene(scene, Simplygon.EPipelineRunMode_RunInThisProcess)
    return scene

# Saves the scene in the output directory into a file with the correct LOD numbering
def save_lod(sg: Simplygon.ISimplygon, scene: Simplygon.spScene, output_dir: str, asset_name: str, lod_num: Number):
    # Create the output path
    file_name = "{}_LOD{}.fbx".format(asset_name, lod_num)
    print("Saving {}".format(file_name))
    export_scene(sg, scene, os.path.join(output_dir, file_name))

# Creates the LOD chain for the specified asset and saves out the LOD files
def create_lods(sg: Simplygon.ISimplygon, asset_name: str, asset_path: str, output_dir: str, screen_sizes: list):
    # Get the file name
    asset_scene = import_scene(sg, asset_path)
    current_lod_num = 0
    for screen_size in screen_sizes:
        scene = reduce(sg, asset_scene, screen_size)
        current_lod_num += 1
        save_lod(sg, scene, output_dir, asset_name, current_lod_num)

def create_lod_chains(sg: Simplygon.ISimplygon, input_dir: str, output_dir: str, vertex_targets: list):
    for asset_file in os.listdir(input_dir):
        if asset_file.endswith(".fbx"):
            asset_name = asset_file.split(".")[0]
            input_path = os.path.join(input_dir, asset_file)
            print("Creating LOD chain for {}".format(asset_name))
            create_lods(sg, asset_name, input_path, os.path.join(output_dir, asset_name), vertex_targets)


def main():
    sg = simplygon_loader.init_simplygon()
    create_lod_chains(sg, "input", "lods", [600,300,100])

    del sg

if __name__== "__main__":
    main()