Getting started with custom Simplygon nodes in Houdini
Written by Jesper Tingvall, Product Expert, Simplygon
Disclaimer: The code in this post is written using version 9.2.1400.0 of Simplygon and Houdini 19.0.531. If you encounter this post at a later stage, some of the API calls might have changed. However, the core concepts should still remain valid.
Introduction
This post will demonstrate how to access the Simplygon scripting API through our Houdini plugin. We are going to create a custom geometry node running Simplygon's reduction processor and pass parameters from Houdini's user interface to it.
Prerequisites
This example will use the preview Simplygon integration in Houdini, but the same concepts can be applied to all other integrations of the Simplygon API. Notice that the Simplygon integration in Houdini is currently in preview so it is very bare bone at the moment and can change in future releases.
Problem to solve
We want to use Simplygon as a node in our our Houdini geometry network to perform mesh reduction. This node should also have parameters we can change from the user interface. The parameter we want to change is not currently avaliable from the preview plugin's user interface.
Solution
The solution is to create a custom geometry node which invokes Simplygon to do processing.
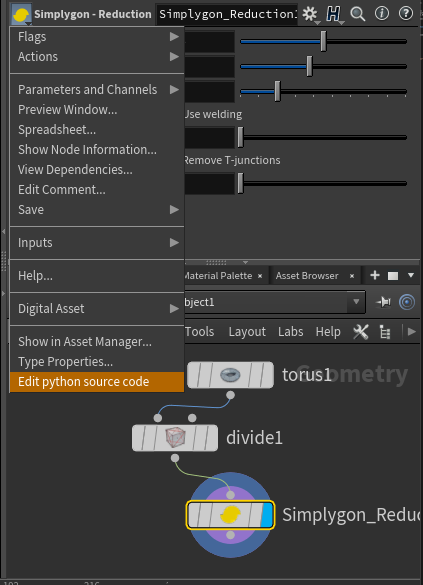
To help us in this task we can inspect the source code of the three geometry nodes which ship with the Simplygon plugin. Easiest way to do this is adding a node to the network and then selecting it and pick Edit python source code from the menu.
Create a new geometry node
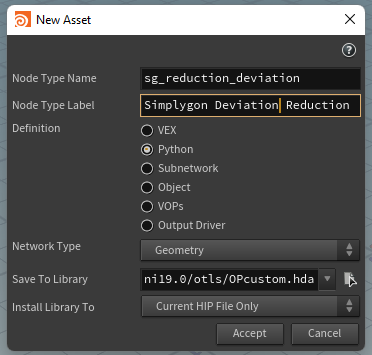
To create a new node in Houdini go to File → New Asset. In the popup set the Operator Definition to Python, then set Network Type to Geometry. For more information on how to create new assets in Houdini consult their documentation. When filled in all fields click accept.
Custom parameters in Houdini's user interface
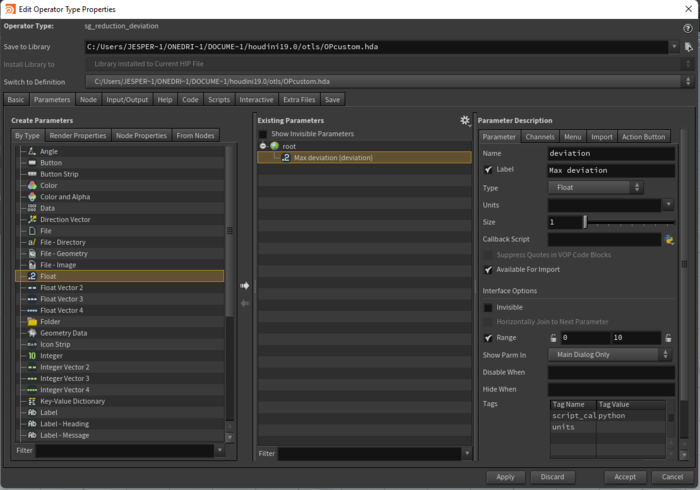
After clicking accept the Edit Operator Type Properties window appears. Go to Parameters tab. Here we can add all parameters we want to expose in our interface. For this example we will just add one; Max Deviation. Drag Float from Create Parameters collumn into Existing Parameters collumn. Assign name; this is what we will refer to it in script as, and rest of the parameters.
To change code of operator go to Code tab. This is where we'll write the code for the operator.
Export from Houdini
First we define where we want to save our temporary file.
inputFile = os.path.join(simplygonTempDir, 'input.bgeo')

node = hou.pwd()
geo = node.geometry().freeze()
geo.saveToFile(inputFile)
Reduction pipeline with deviation from user interface
We are going to create a reduction pipeline and set it to use max deviation as its target metric using SetReductionTargets and SetReductionTargetMaxDeviation. Via hou.evalParm('deviation') we can get the the UI deviation parameter we created above. Once that is set we run the pipeline.
sgReductionPipeline = sg.CreateReductionPipeline()
sgReductionSettings = sgReductionPipeline.GetReductionSettings()
sgReductionSettings.SetReductionTargets(Simplygon.EStopCondition_All, False, False, True, False)
sgReductionSettings.SetReductionTargetMaxDeviation(hou.evalParm('deviation'))

sgReductionPipeline.RunSceneFromFile(inputFile, None, Simplygon.EPipelineRunMode_RunInNewProcess)
Display progress
To make Houdini display the progress of our reduction pipeline we are going to use a custom Observer. Via Houdini's globalOperation.updateProgress method we can report back how our is progressing.
class CustomObserver(Simplygon.Observer):
    def OnProgress(self, subject, progressPercent):
        try:
            globalOperation.updateProgress(progressPercent/100.0)
            return True
        except hou.OperationInterrupted:
            return False
To add the observer to our reduction pipeline we need to add it before starting the process.
sgReductionPipeline.AddObserver(customObserver)
Import to Houdini
To export from Simplygon we set up a scene exporter. After it has exported we can use geo.loadFromFile(outputFile) to load the exported scene back into Houdini. We also run shutil.rmtree(simplygonTempDir, True) cleans up the temporary directory we created during export and operation.__exit__(None, None, None) to tell Houdini that our operation has finished.
sgExporter = sg.CreateSceneExporter()
sgExporter.SetScene(sgReductionPipeline.GetProcessedScene())
sgExporter.SetExportFilePath(outputFile)
sgExporter.RunExport()

geo.loadFromFile(outputFile)

shutil.rmtree(simplygonTempDir, True)

operation.__exit__(None, None, None)
Result
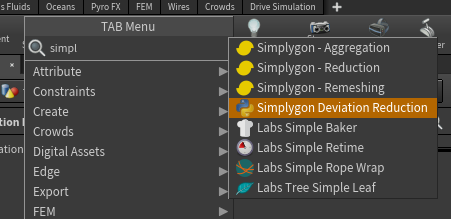
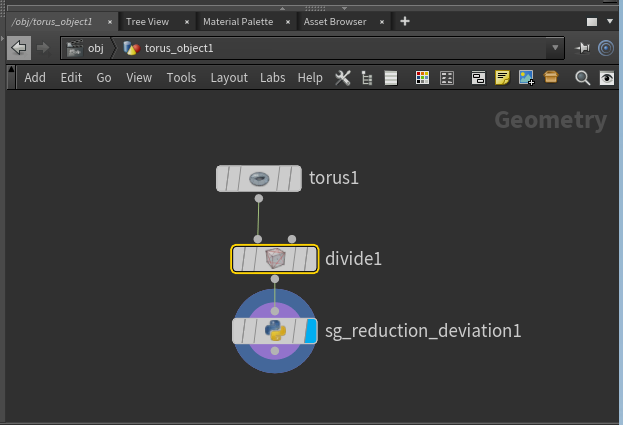
After saving and exiting the Operator Type Properties window we can add our new node. Our node was of the type gemoetry so we need to be inside the geometry network. Inside the Geometry network we can right click and search for the name we gave to our node, there we'll find our new node.
Simplygon needs triangulated geometry as input, so we need to add a Triangulate node before our custom Deviation reduction node.
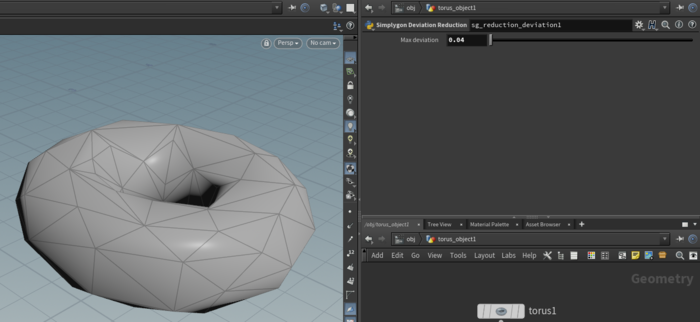
We can change the max deviation property in the UI and see that the model is updated.
Complete script
import gc
import os
import shutil
import uuid

from simplygon import simplygon_loader
from simplygon import Simplygon

globalOperation = None

class CustomObserver(Simplygon.Observer):
    def OnProgress(self, subject, progressPercent):
        try:
            globalOperation.updateProgress(progressPercent/100.0)
            return True
        except hou.OperationInterrupted:
            return False

customObserver = CustomObserver()


def RunReduction():
    simplygonTempDir = os.path.expandvars(os.getenv('SIMPLYGON_9_TEMP'))
    if not simplygonTempDir:
        print('SIMPLYGON_9_TEMP not set')
        return

    simplygonTempDir = os.path.join(simplygonTempDir, str(uuid.uuid4()))
    os.makedirs(simplygonTempDir)

    inputFile = os.path.join(simplygonTempDir, 'input.bgeo')
    outputFile = os.path.join(simplygonTempDir, 'output.bgeo')

    node = hou.pwd()
    geo = node.geometry().freeze()
    geo.saveToFile(inputFile)

    if not geo.containsPrimType(hou.primType.Polygon):
        print('Unsupported geometry')
        return

    sgReductionPipeline = sg.CreateReductionPipeline()
    sgReductionSettings = sgReductionPipeline.GetReductionSettings()
    sgReductionSettings.SetReductionTargets(Simplygon.EStopCondition_All, False, False, True, False)
    sgReductionSettings.SetReductionTargetMaxDeviation(hou.evalParm('deviation'))

    sgReductionPipeline.AddObserver(customObserver)

    sgReductionPipeline.RunSceneFromFile(inputFile, None, Simplygon.EPipelineRunMode_RunInNewProcess)

    sgExporter = sg.CreateSceneExporter()
    sgExporter.SetScene(sgReductionPipeline.GetProcessedScene())
    sgExporter.SetExportFilePath(outputFile)
    sgExporter.RunExport()

    geo.loadFromFile(outputFile)

    shutil.rmtree(simplygonTempDir, True)

    operation.__exit__(None, None, None)

sg = simplygon_loader.init_simplygon()
if sg is not None:
    with hou.InterruptableOperation("Running reduction", "Simplygon", open_interrupt_dialog=True) as operation:
        globalOperation = operation
        RunReduction()
sg = None
gc.collect()