Impostor: Billboard cloud for vegetation
Disclaimer: The code in this post is written using version 9.1.282 of Simplygon. Should you encounter this post running a different version, some of the API calls might differ. However, the core concepts should still remain valid.
Overview
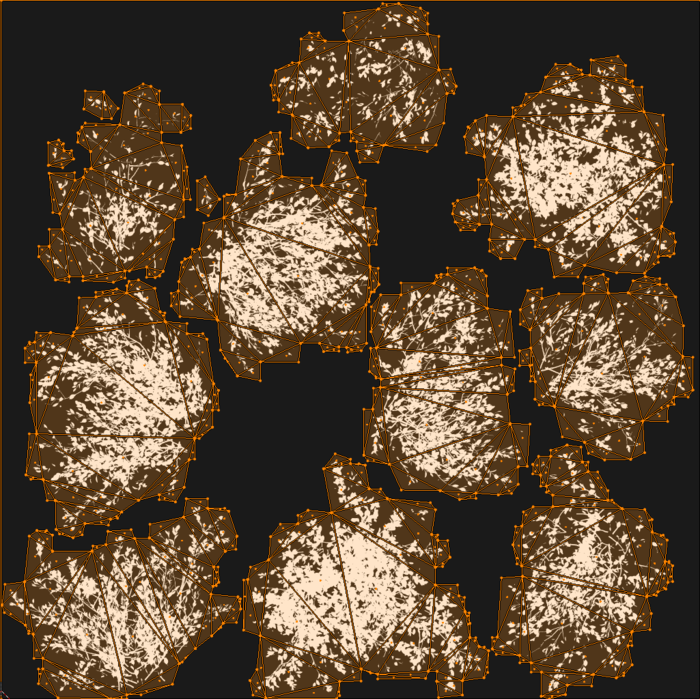
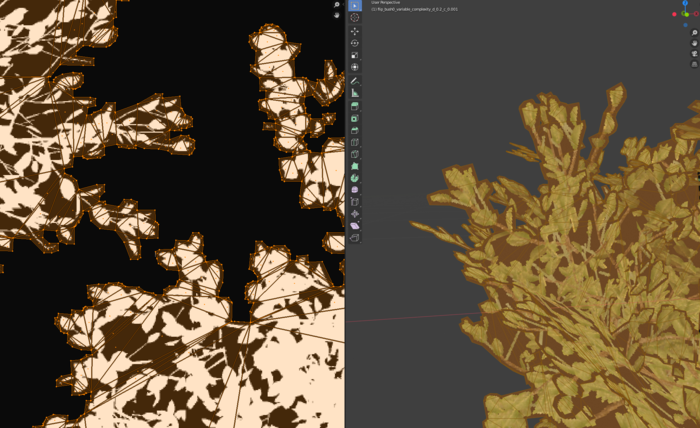
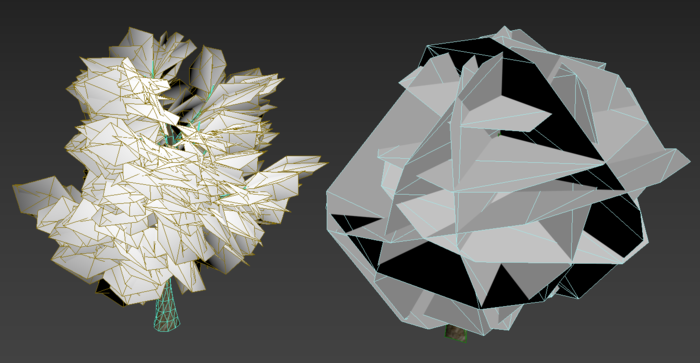
The goal of the billboard cloud processor is to replace objects in a scene with a view independent set of billboards. For vegetation assets the Billboard mode should be set to Foliage. This mode allows the billboards to represent the foliage volume with intersecting planes. The leaves should map to the billboards in a manner that keeps the perception of volume and silhouette close to the original tree.
- Impostor overview (SimplygonSDK_9.1.282.0) - From the Simplygon 9 Documentation: Optimization concepts page which goes into explaining the Impostor processor and its settings.
- Impostor API (SimplygonSDK_9.1.282.0) - The complete code for generating the impostors in this post.
Billboard Cloud Settings
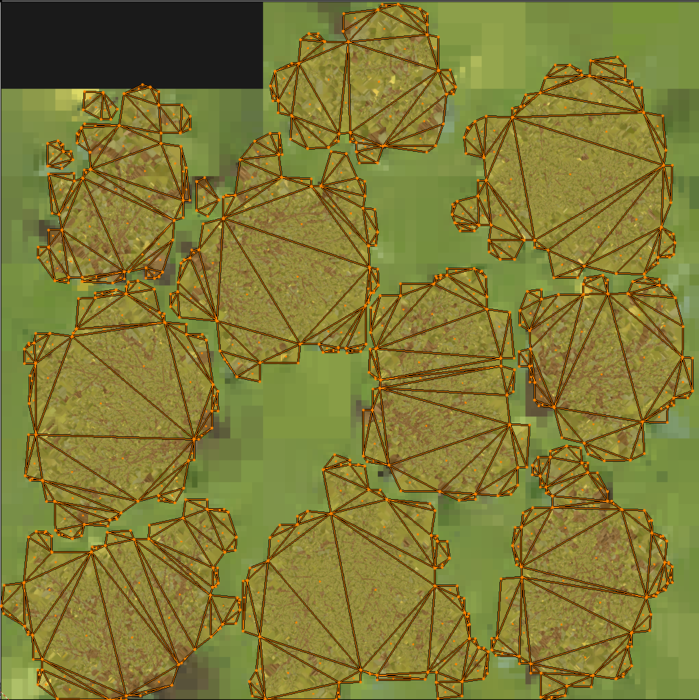
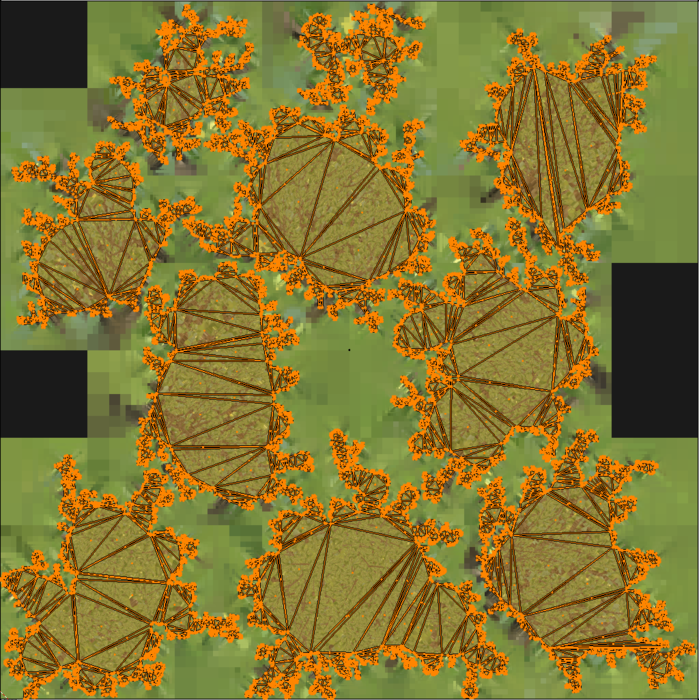
Density and geometric complexity
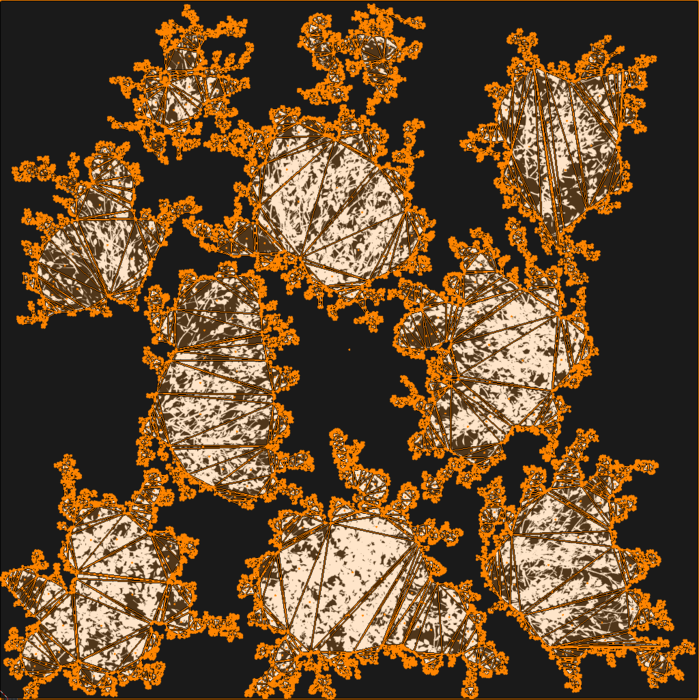
There are mainly two settings that determine the amount and shape of the billboards: density and complexity. Density is discussed more in-depth in the Impostor overview: Density. The density determines how closely the billboards have to be to the leaves they're representing (i.e. the maximum projection distance), which also means it controls the number of billboards needed. A lower density means fewer planes. The geometric complexity controls how close the geometry silhouette of the billboard should be to its projection. Having a higher value means a closer fit, but more triangles are needed. The complexity setting controls the trade-off between having extra geometry and the wasted texture space and overdraw during rendering when lots of the billboards will be rendered completely transparent.

| Low geometric complexity (more overdraw) | Medium geometric complexity | High geometric complexity (more geometry) | |
|---|---|---|---|
| Diffuse map | 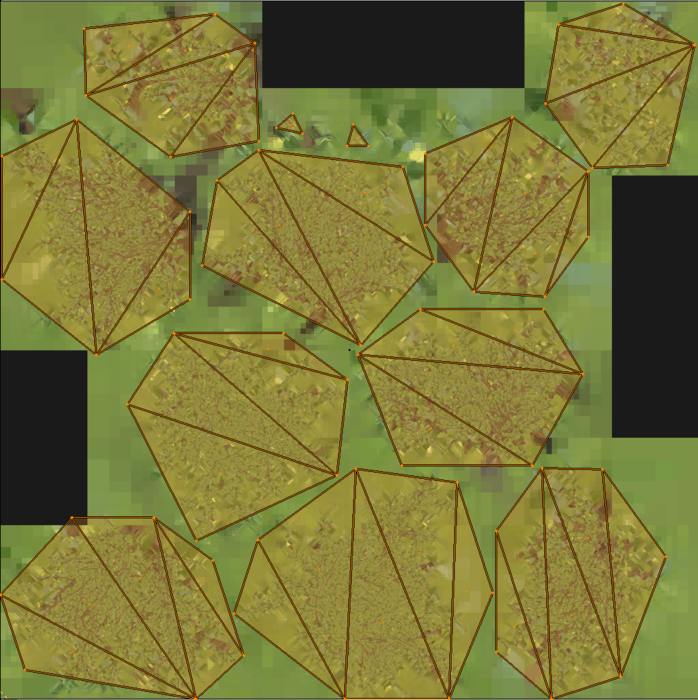 |
 |
 |
| Opacity map | 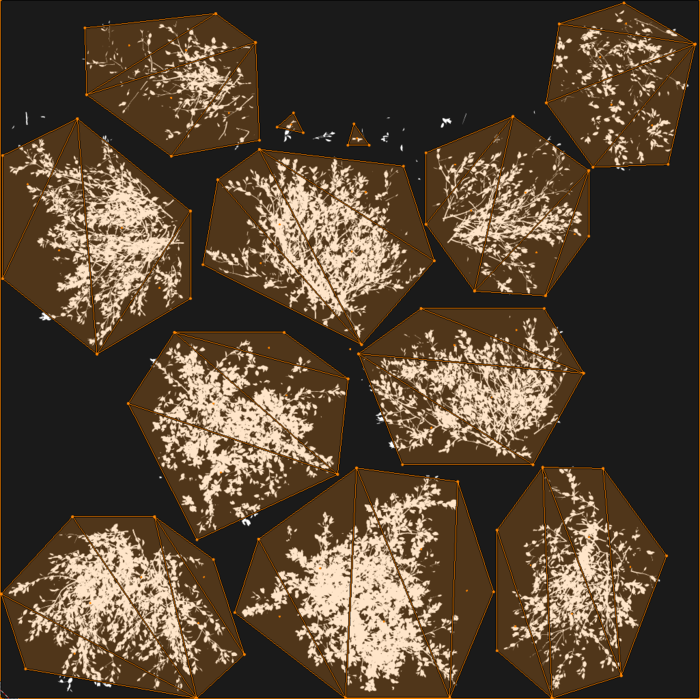 |
 |
 |
| Left: UV-atlas, Right: Actual billboard cloud 3d-object |
|---|
 |
| The silhouette of the billboard closely follows the projection of leaves when the geometric complexity is set to high |
Two-sided
The trees being processed in this example have leaves that are two-sided. By enabling the TwoSided setting both front and back facing leaf geometries will be mapped to billboards. You might have a tree where the leaves have an actual back and front geometry/texture, in which case the TwoSided flag should be disabled.
// Create the Impostor processor
Simplygon::spImpostorProcessor sgImpostorProcessor = sg->CreateImpostorProcessor();
sgImpostorProcessor->SetScene( sgScene );

Simplygon::spImpostorSettings sgImpostorSettings = sgImpostorProcessor->GetImpostorSettings();
// Set impostor type to Billboard cloud.
sgImpostorSettings->SetImpostorType( Simplygon::EImpostorType::BillboardCloud );

Simplygon::spBillboardCloudSettings sgBillboardCloudSettings = sgImpostorSettings->GetBillboardCloudSettings();
// Set billboard cloud mode to Foliage.
sgBillboardCloudSettings->SetBillboardMode( Simplygon::EBillboardMode::Foliage );
sgBillboardCloudSettings->SetBillboardDensity( 0.5f );
sgBillboardCloudSettings->SetGeometricComplexity( 0.9f );
sgBillboardCloudSettings->SetMaxPlaneCount( 10 );
sgBillboardCloudSettings->SetTwoSided( true );

// Set foliage and mapping image settings
...

// Start the impostor process.
sgImpostorProcessor->RunProcessing();
Foliage Settings
Separate trunk and foliage
This setting is a quick way to be able to separate the foliage part of a tree from the trunk/branch part. If you make sure you're only sending the foliage part to Simplygon already or if you simply want everything to be represented by billboards you can disable this setting by setting SeparateTrunkAndFoliage to false. There are four categories to the setting where you specify if you want a part to be regarded as foliage (i.e. to be represented by a billboard) based on how large or how many triangles the part contains. If the leaves in the tree for instance are all quads (two triangles per leaf geometry), you can set the SeparateFoliageTriangleThreshold to 3 to make sure all parts consisting of less than three triangles should be regarded as foliage. This means the trunk and branches are left as geometry that you can choose to reduce with the TrunkReductionRatio.
spFoliageSettings foliageSettings = impostorProcessor->GetImpostorSettings()->GetBillboardCloudSettings()->GetFoliageSettings();
// We want to separate the foliage from the tree trunk. Create impostors for the foliage, keep the trunk (but reduce it)
foliageSettings->SetSeparateTrunkAndFoliage(true );
// All parts with less than 10% of the part with the maximum triangle count, is considered to be foliage
foliageSettings->SetSeparateFoliageTriangleRatio( 0.1f );
// All parts with less than 10 triangles are considered to be foliage
foliageSettings->SetSeparateFoliageTriangleThreshold( 10 );
// Consider parts to be foliage if the area is less than 10% of the max
foliageSettings->SetSeparateFoliageAreaThreshold( 0.1f );
// Consider parts to be foliage if the size is less than 10% of the max
foliageSettings->SetSeparateFoliageSizeThreshold( 0.1f );
// Reduce the tree trunk to 50%
foliageSettings->SetTrunkReductionRatio( 0.5f );
Materials
Input materials
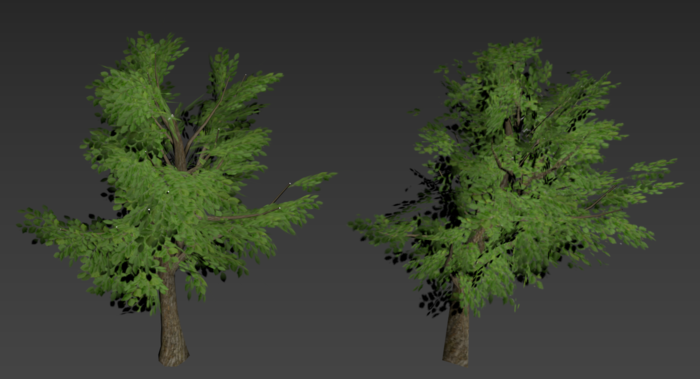
If the input material has transparency information the input foliage materials needs to have their BlendMode set to EMaterialBlendMode::Blend or EMaterialBlendMode::Mask. If it is set to EMaterialBlendMode::Opaque (which is the default) any transparency in the input material will be ignored.
// For all materials in the scene set the blend mode to blend (instead of opaque)
spMaterialTable materialTable = originalScene->GetMaterialTable();
uint mCount = materialTable->GetMaterialsCount();
for( uint m = 0; m < mCount; ++m )
{
	materialTable->GetMaterial( m )->SetBlendMode( EMaterialBlendMode::Blend );
}
| Correct opacity output | Faulty opacity output | |
|---|---|---|
| Tree1 |  |
 |
| Tree2 | 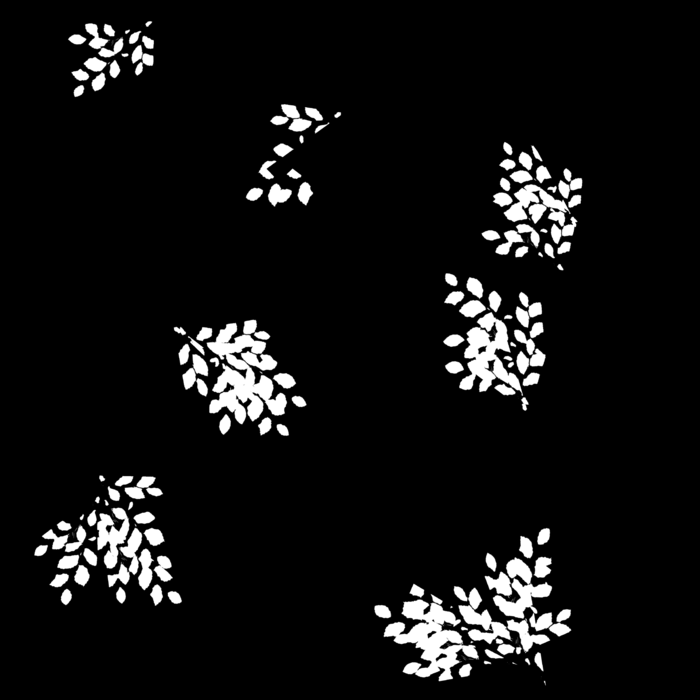 |
 |
| The output opacity when the input material has EMaterialBlendMode::Blend. | The output opacity when the input material has EMaterialBlendMode::Opaque. You get the exact leaf mesh projections appearing opaque. |
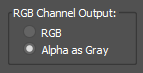
If you have an input opacity map that seems to be ignored, make sure that the texture with the alpha is connected to the opacity channel of the material. You can explicitly set which component in the texture that has the alpha values by using a swizzling node. If you use Simplygon file readers to load the scene and setup the materials it might be trying to find the alpha in the fourth RGBa component when it is actually in the first R component for instance. The code below shows how to create a texture node and use either the R or the a component of the texture.
spShadingTextureNode leafOpacityMap = sg->CreateShadingTextureNode();
leafOpacityMap->SetTextureName( "leafTextureAlpha" );

spShadingSwizzlingNode swizzlingNode = sg->CreateShadingSwizzlingNode();

//The first component of the node assigned to the opacity channel determines the opacity
//So assign the texture node to the first component
swizzlingNode->SetInput( 0, leafOpacityMap );

//Now decide which component of the texture node should be used as alpha

// If the transparency information is in the first component (R-component)
// Usually happens if the input texture is an R or RGB texture
swizzlingNode->SetRedComponent( 0 );

// If the transparency information is in the fourth component (a-component)
// Usually happens if the input texture is a diffuse map with RGBa components
//swizzlingNode->SetRedComponent( 3 );

leafMaterial->SetShadingNetwork( SG_MATERIAL_CHANNEL_OPACITY, swizzlingNode );
If you get dark output textures, your original textures might be dark outside of the leaf part. That might work in the original object where the leaf geometry exactly maps to the texture, but it can cause issues on the billboard where the leaves are now projected to the planes. This issue can be remedied by making sure the space outside of the leaf in the original map has a similar color to the leaf.

Mapping image settings
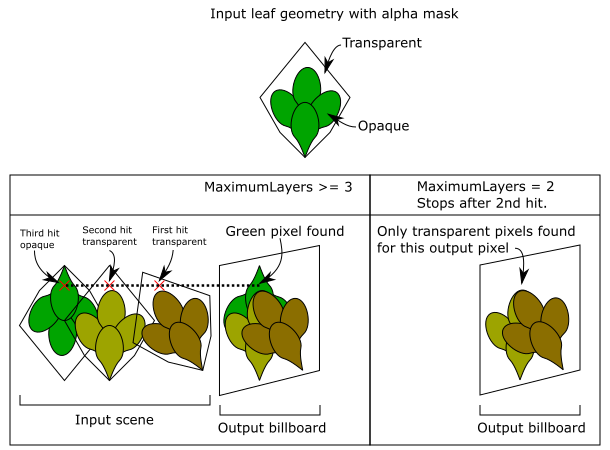
If your input foliage materials have transparency you might need to tune the spMappingImageSettings::SetMaximumLayers() for your particular scene. The mapping image stores each hit (triangle id and barycentric coordinate) in order and adds them together with the selected blend mode when casting. If the MaximumLayers is too low, you will miss occluded leaves on your output billboard.
 |
|---|
Simplygon::spMappingImageSettings sgMappingImageSettings = sgImpostorProcessor->GetMappingImageSettings();

sgMappingImageSettings->SetMaximumLayers( 10 );

Simplygon::spMappingImageOutputMaterialSettings sgOutputMaterialSettings = sgMappingImageSettings->GetOutputMaterialSettings(0);

// Setting the size of the output material for the mapping image. This will be the output size of the
// textures when we do material casting in a later stage.
sgOutputMaterialSettings->SetTextureWidth( 1024 );
sgOutputMaterialSettings->SetTextureHeight( 1024 );
sgOutputMaterialSettings->SetMultisamplingLevel( 2 );
Foliage material
When an impostor has been generated with the billboard cloud mode foliage all the original materials and textures will still be retained in the scene. The trunk and branches for example might still remain as regular geometry and have their original materials. The processor automatically creates a new empty material and adds it to the scene's MaterialTable during processing. All the billboards will be assigned the new foliage material. You can fetch the material id after processing using spImpostorProcessor::GetBillboardCloudMaterialId(). The material is empty so you need to cast the channels yourself using the MappingImage also received from the processor.
spMaterialTable lodMaterialTable = lodScene->GetMaterialTable();

//Get the mapping image
spMappingImage foliageMappingImage = impostorProcessor->GetMappingImage();
// Get the newly created foliage material
spMaterial foliageMaterial = lodMaterialTable->GetMaterial( impostorProcessor->GetBillboardCloudMaterialId() );

//Cast the material channels
....
Cast materials
Gutter space
Make sure that all ColorCasters and the NormalCaster have a Larger than zero Dilation value and that FillMode is set to something other than EAtlasFillMode::NoFill. This means the pixels outside of the actual projection will be filled with similar colors. It's important that the gutter space of the color and normal textures are not empty, otherwise you might get very dark foliage when the mip-maps are rendered. The images above (that show the different results from varying geometric complexity) correctly show the diffuse map with dilation/fill and the opacity mask without dilation/fill.
Normal map
If the billboard cloud was generated with TwoSided, then enabling the FlipBackfacingNormals flag for the NormalCaster will make sure all leaf normals (in the normal map) point in the same direction as the billboard. More about why that is important under the Rendering foliage billboards below.
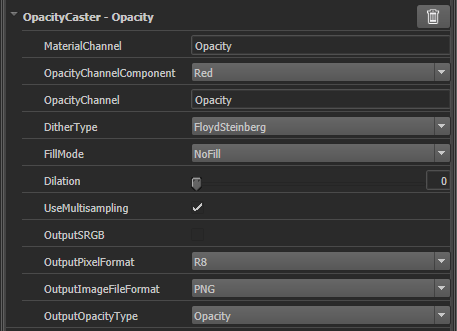
Opacity map
It is very important when generating the opacity map that Dilation is set to zero and FillMode is set to EAtlasFillMode::NoFill. This makes sure that you get a pixel perfect opacity mask of the leaves projected to the billboards. Otherwise the gutter space will contain unwanted opaqueness next to the leaves.
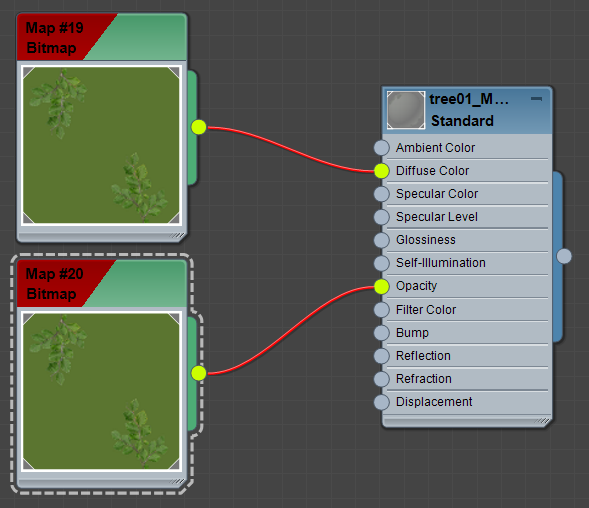
Diffuse map
Because we are generating an explicit opacity map, set the ColorCaster's BakeOpacityInAlpha setting to false and for the diffuse map set the OutputPixelFormat to EPixelFormat::R8G8B8 (no alpha).
Diffuse example
//Cast diffuse map
spColorCaster colorCaster = sg->CreateColorCaster();
colorCaster->SetSourceMaterials( originalMaterialTable );
colorCaster->SetSourceTextures( originalTextures );
colorCaster->SetMappingImage( foliageMappingImage );
colorCaster->GetColorCasterSettings()->SetDilation(10);
colorCaster->GetColorCasterSettings()->SetBakeOpacityInAlpha( false );
colorCaster->GetColorCasterSettings()->SetUseMultisampling( true );
colorCaster->GetColorCasterSettings()->SetFillMode( EAtlasFillMode::Interpolate );
colorCaster->GetColorCasterSettings()->SetOutputSRGB( true );
colorCaster->GetColorCasterSettings()->SetMaterialChannel( SG_MATERIAL_CHANNEL_DIFFUSE );
colorCaster->GetColorCasterSettings()->SetOutputPixelFormat( EPixelFormat::R8G8B8 );
colorCaster->SetOutputFilePath( textureName.c_str() );
colorCaster->RunProcessing();
Opacity example
//Cast opacity map
spOpacityCaster opacityCaster = sg->CreateOpacityCaster();
opacityCaster->SetSourceMaterials( originalMaterialTable );
opacityCaster->SetSourceTextures( originalTextures );
opacityCaster->SetMappingImage( foliageMappingImage );
opacityCaster->GetOpacityCasterSettings()->SetOutputPixelFormat( EPixelFormat::R8 );
opacityCaster->GetOpacityCasterSettings()->SetDilation( 0 );
opacityCaster->GetOpacityCasterSettings()->SetFillMode(EAtlasFillMode::NoFill);
opacityCaster->SetOutputFilePath( textureName.c_str() );
opacityCaster->RunProcessing();
Normal map example
//Cast normal map
spNormalCaster normalCaster = sg->CreateNormalCaster();
normalCaster->SetSourceMaterials( originalMaterialTable );
normalCaster->SetSourceTextures( originalTextures );
normalCaster->SetMappingImage( foliageMappingImage );
normalCaster->GetNormalCasterSettings()->SetOutputPixelFormat( EPixelFormat::R8G8B8 );
normalCaster->GetNormalCasterSettings()->SetDilation( 10 );
normalCaster->GetNormalCasterSettings()->SetFlipBackfacingNormals( true );
normalCaster->SetFillMode( Simplygon::EAtlasFillMode::Interpolate );
normalCaster->GetNormalCasterSettings()->SetGenerateTangentSpaceNormals( true );
normalCaster->SetOutputFilePath( textureName.c_str() );
normalCaster->RunProcessing();
Code
The code for this example is available on the API-page here.
3ds Max
Here are some quick settings to generate a foliage billboard cloud in 3ds Max.
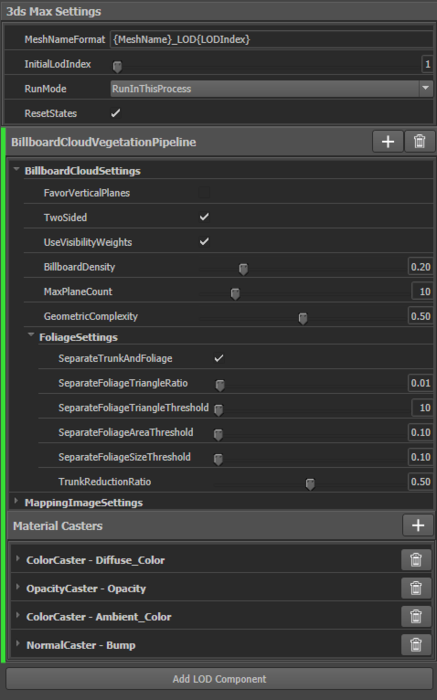
I highlight the tree I want to process and press the +-symbol next to Material Casters and choose Automatic to automatically get Casters for Diffuse, Ambient, Normal map and Opacity.

In my particular example, the same input RGBa texture is used as both diffuse map and opacity map in the input material. The a channel has the transparency information.
So make sure that 3ds Max knows to use the alpha channel for transparency.
To make it look like this instead.

| Left: Input asset, Right: Billboard cloud |
|---|
 |
 |
Rendering foliage billboards
In this example I render the billboards in Blender 2.82. The first thing that needs addressing when rendering in Blender is to switch BlendMode from Opaque to Alpha Clip in the Materials tab. If the billboard cloud was generated with the TwoSided flag enabled, then also make sure to disable Backface Culling.
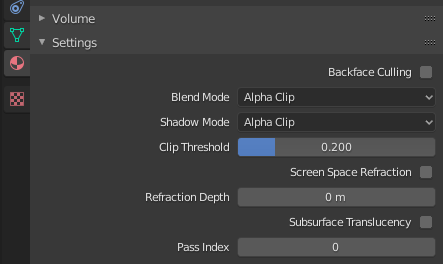
When rendering the billboard cloud, the alpha cutoff/threshold value determines at what opacity value the foliage should not be rendered at all (In Blender referred to as Clip threshold and used when Blend Mode is set to Alpha Clip). Having a low threshold means the tree will be denser and having a high threshold means it becomes sparser.
 |
 |
|---|---|
| Low threshold, denser foliage | High threshold, sparser foliage |
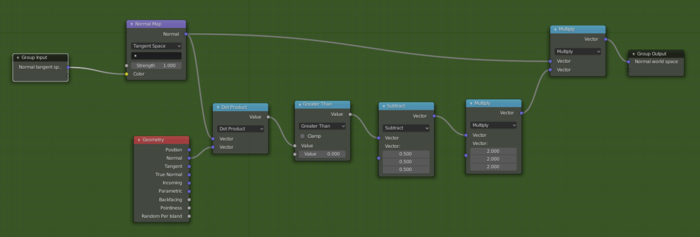
If the TwoSided settings flag is enabled during creation, the leaves will be considered to be viewable from both sides. This means that the billboards will have both back facing and front facing leaves projected onto them. The renderer will need to flip the normals in the normal map when viewing the billboard from its backside. When creating the billboard you can enable the FlipBackfacing settings flag in the normal caster to make sure all the normals in the normal map will uniformly be pointing in their billboard's normal direction. Otherwise, you might get visual artifacts on the interpolation between two projections of leaves. This occurs for instance if they are supposed to have the same direction, but because they are pointing in opposite directions, the interpolation between them gets broken.
This node group in blender also flips the normals to uniformly point in the billboards normal direction.
The billboards can be a good representation of leaves when they are viewed from their normal (or opposite) direction. But when viewed from the side they tend to break the illusion. By making a node group in Blender we can fade the billboard to transparent as the view approaches the worst case.
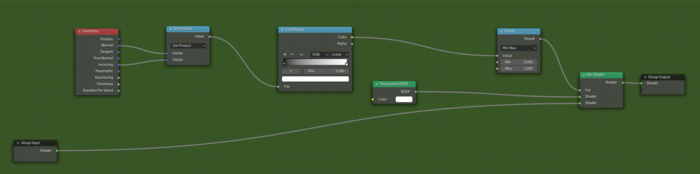
Show shader nodes in action (Blender). The first object shows the billboard cloud just after import. The second one has flipped back facing normals. The third one fades out planes viewed from the side.
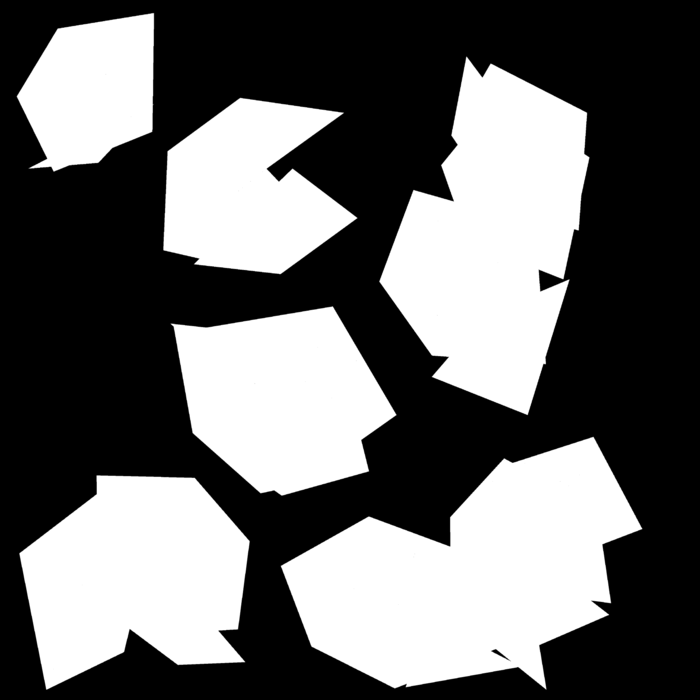
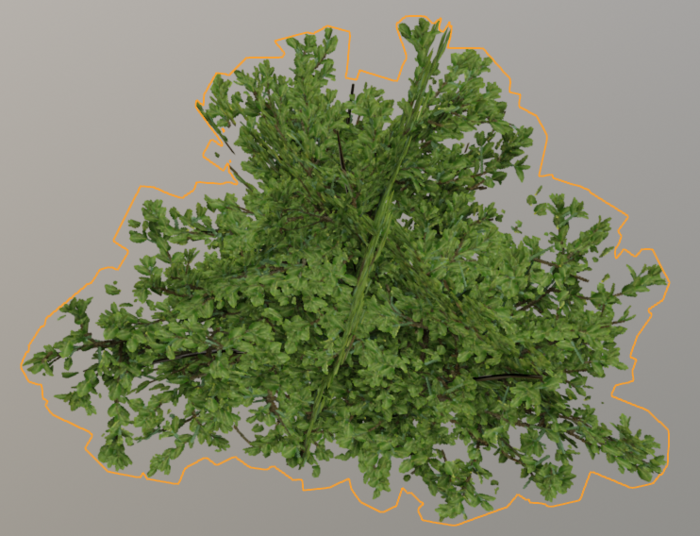
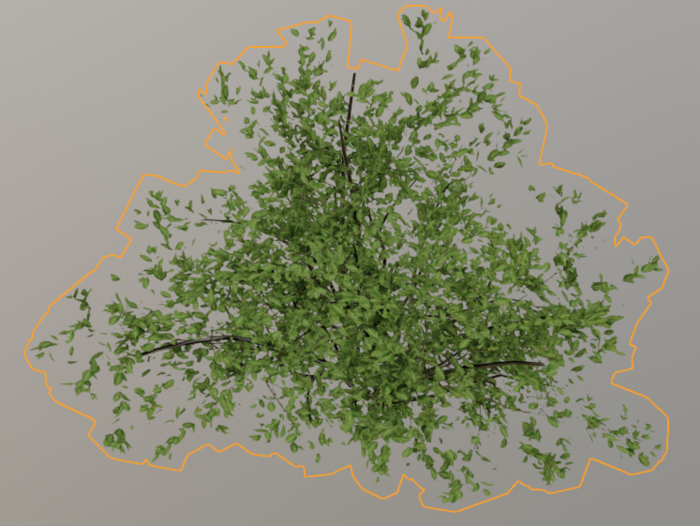
Render some bushes before and after processing
Render some trees before and after processing. The tree trunks remain as regular geometry.