A look at impostor from single view in Unity HDRP
Written by Jesper Tingvall, Product Expert, Simplygon
Disclaimer: The code in this post is written using version 10.2.400.0 of Simplygon and Unity 2022.3.5f1. If you encounter this post at a later stage, some of the API calls might have changed. However, the core concepts should still remain valid.
Introduction
In this blog post we will take a look at how material casting for Unity HDRP render pipeline allows us to create extremely lightweight impostors.
Prerequisites
This example will use the Simplygon integration in Unity, but the same concepts can be applied to all other integrations of the Simplygon API. Material casting part of blog is applicable to URP render pipeline as well. To use Cross Fading in LOD component you need to render the object with a shader that supports it.
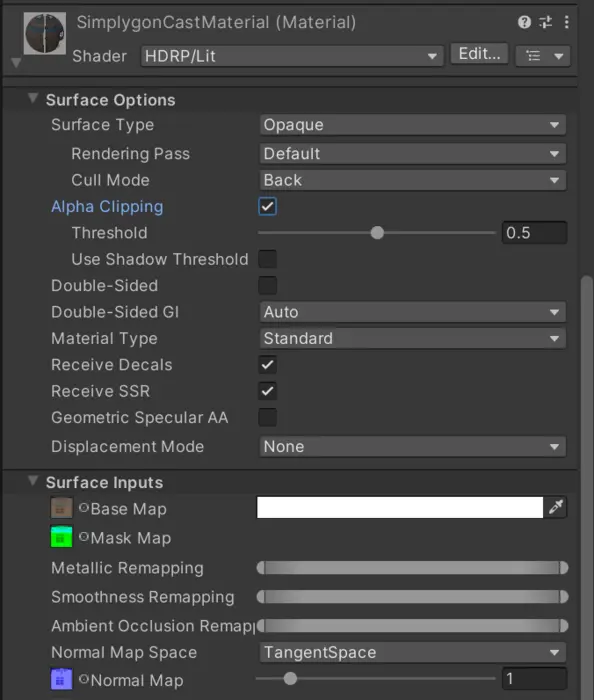
It is also important to point out that we do not support shaders created for HDRP via shader graph. With compute casting we currently support HDRP/Lit and URP/Lit shaders. There is also some additional URP and HDRP limitations to be aware of
Problem to solve
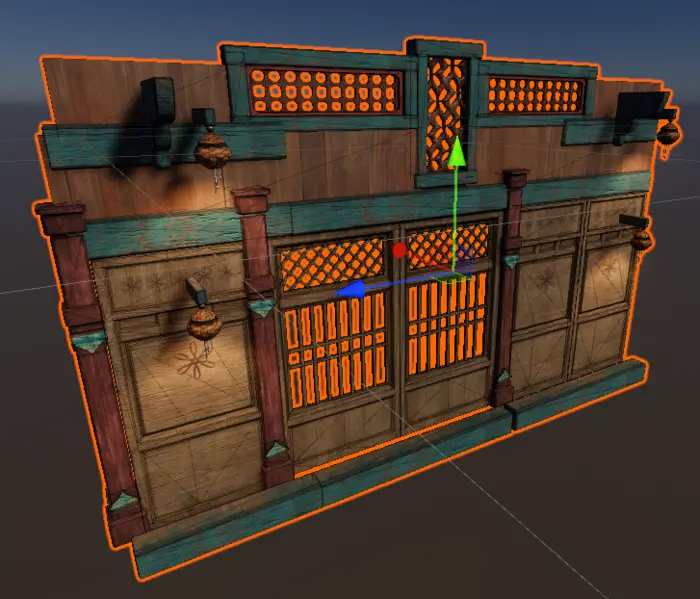
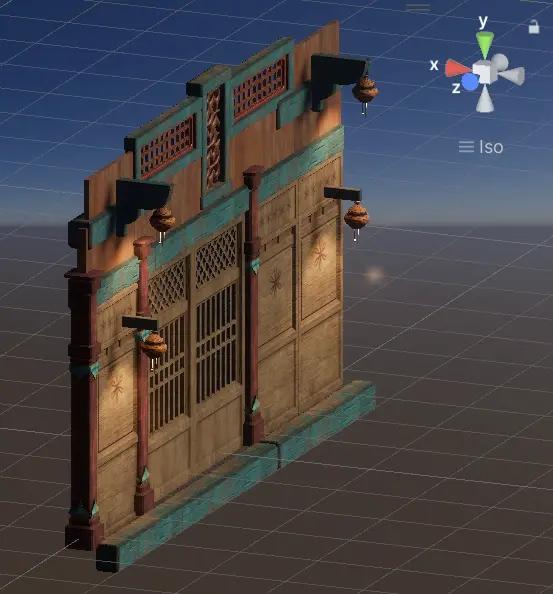
We have a game created in Unity using the HDRP render pipeline. In it we have a kit bashed wall prefab which we want to optimize. The primary thing we want to optimize is triangle count. It would be nice to adress draw calls as well, specifically when it is further away from camera. One additional thing we can take into consideration when optimizing is that when this asset is viewed from far away we expect only front side to be visible.
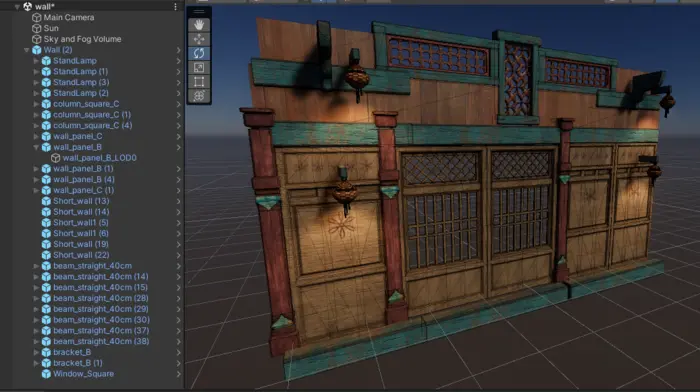
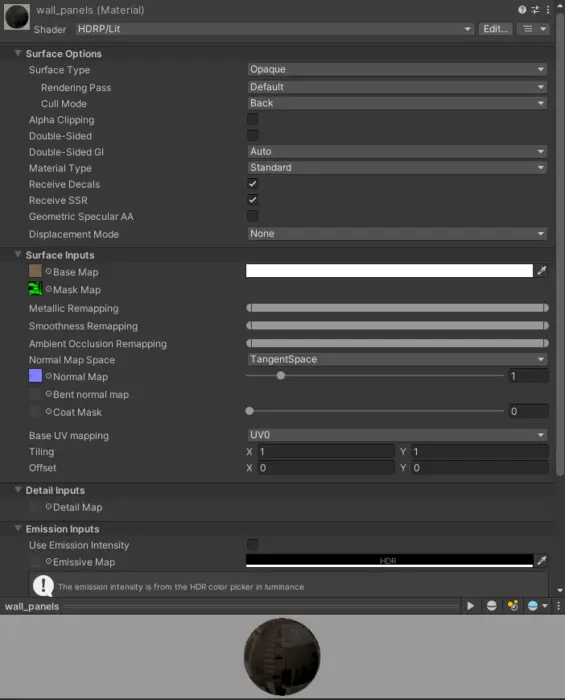
The original asset consists of 33 sub-meshes. Giving it a total of 35k triangles and 6 materials. The materials are using HDRP/Lit shader and has base map, mask map and normal map.
Solution
We are going to create two LOD levels for the prefab. One mid level LOD1 and one super optimized LOD2 for distant viewing. We are then going to assign these created LOD levels to a LODGroup which handles switching between them and the original models.
LOD1 - Reduction
We'll start by reducing the asset with an ordinary reduction pipeline. We add an advanced reduction pipeline by opening up Simplygon's UI then click Add LOD Component → Template → Advanced → Reduction.
We expect to switch to this LOD level when we are at 50% of the screen size. In Unity LOD switch distance is handled by the LODGroup component. It determines which LOD level to showcase depending on how much of the screen height our object's bounding box covers. If we expect our game to be rendered at 1080p then LOD1 should be reduced with a target screen size of 1080 * 0.5 = 520 pixels.
A flag worth discussion is Merge Geometries. If we set this to true then all meshes will be merged into one. If this is a good idea of not depends on the asset, context and engine.
If we merge the meshes together then we would need to cull them as one. If we merge a large object collection together, where we expect most of the collection to not be visible on screen because it is so large, then we would make frustum culling not very effective.
In Unity we can enable render batching of different kinds. So merging objects together might not gain that much performance from a draw call perspective. This has a cost however, as there is always a cost of merging objects during runtime.
Since we expect to switch to this LOD when it is displayed at 50% of screen height we should get little penalty for only being able to cull it together. A small performance boost by us not needing run time batching sounds nice as well, so we enable it.
Here are the reduction settings we will use.
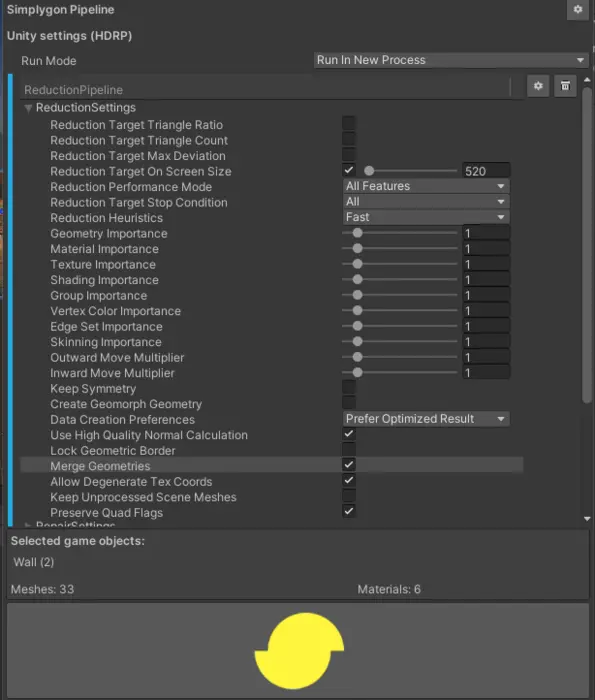
We can then generate our LOD by clicking the Simplygon icon in right corner of Simplygon UI.
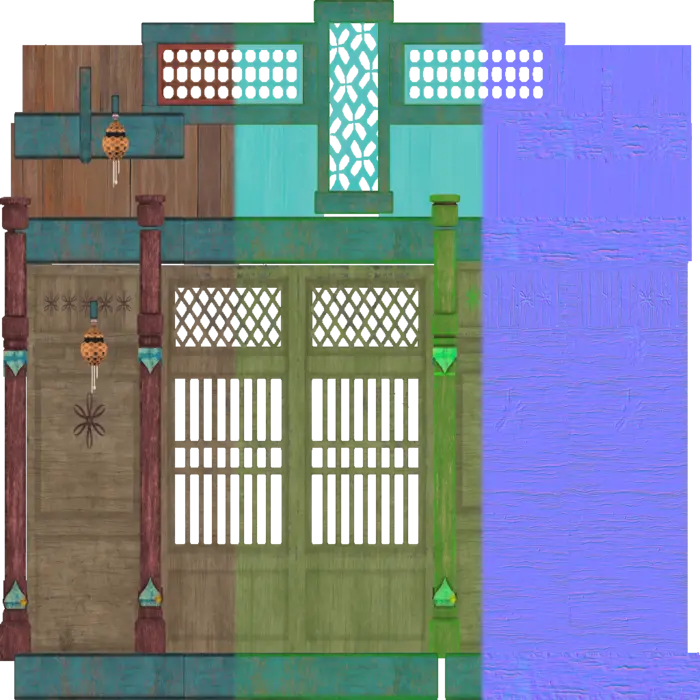
After the LOD has been generated we can see that the materials is not correct. While we have support for material casting HDRP shaders, if a material casting is not done then we do not touch the materials. Instead what we get after processing is a copy of the material that has been squeezed through the intermediary format USD. That means it will lose data in material channels not implemented in that format.
The solution for this is simple, we just replace the materials with the original materials. Once this is done the LOD looks much better.
LOD2 - Reduction
Now we want to create a super optimized LOD2. Let's try to use a reduction pipeline for this one as well. Let us start with using max 3k triangles. We create another advanced reduction pipeline and set Reduction Target triangle count to 3000. We also enable Merge Geometries as with LOD1.
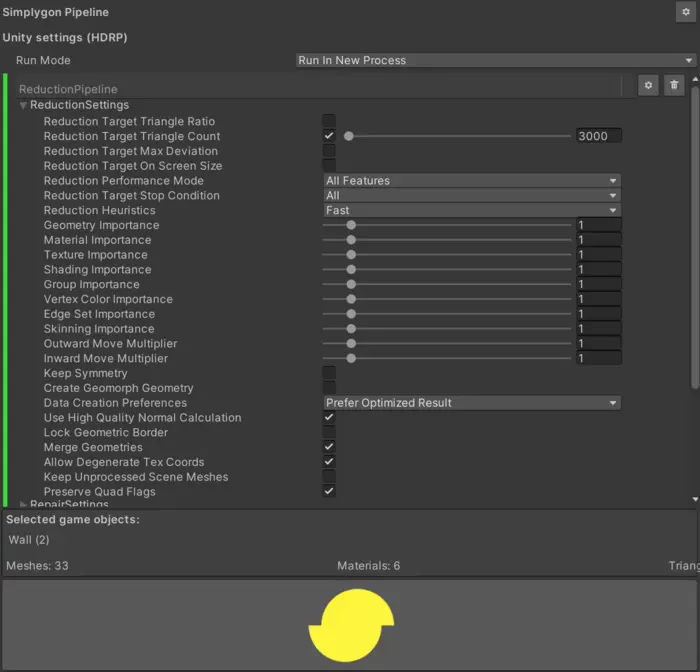
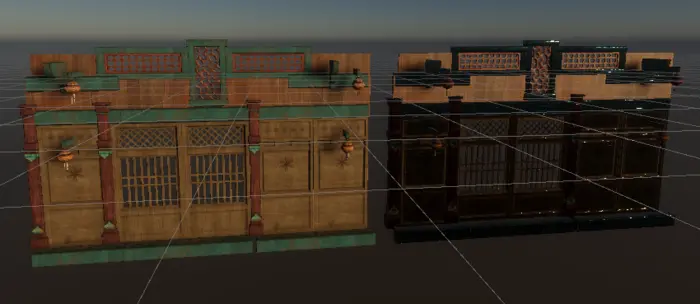
After processing we get a not so good result.
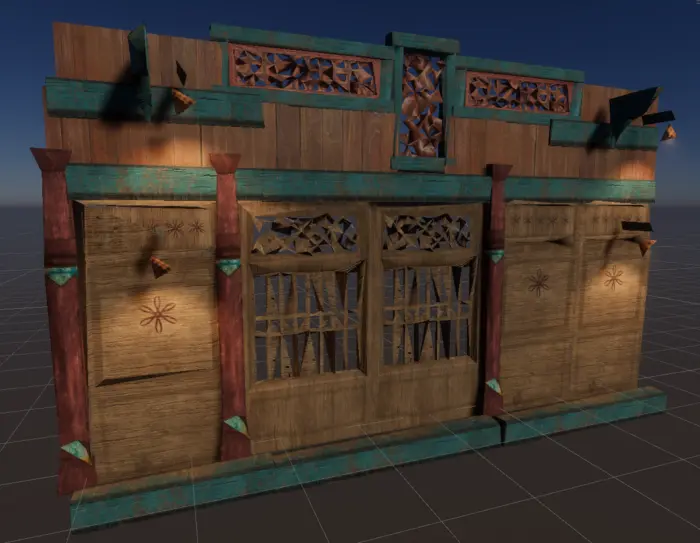
The asset we are working with has two problems which makes it hard to reduce. Firstly the asset is disconnected. Meaning that it is a kit-bashed collection of different assets not sharing vertexes. This can cause holes to appear when reducing it down significantly. Ways to handle this is another topic for the future.
What we can see primary in our asset is that the window grills has been optimized poorly. The grill pattern was created with pure geometry and that means it is hard to reduce the triangles a lot and keep this pattern intact. In other words, in order to create a very slim asset we can not use reduction.
LOD2 - Impostor single view
Instead of doing reduction let us try something different. We are going to create an impostor from the mesh instead. Our asset at distance is pretty much a flat plane so impostor from single view would fit perfectly. If we wanted to create an impostor for another shape we could have gone with remeshing or billboard clouds.
Let us create a impostor from single view pipeline. It can be found under Template → Advanced → Impostor from single view. To make the impostor follow the outlines of our geometry perfect we are going to check use tight fitting.
To create an impostor we need to do material casting. Material casting is done using material casters which in their turn uses a mapping image to transfer textures, or any data form original asset to optimized geometry.
In order to perform material casting we need to understand the material's shader. In old Simplygon version this had to be done by creating a corresponding Simplygon shading networks. But since the introduction of compute casters we can instead provide HLSL or GLSL code for the surface shader. Our support for Unity's HDRP and URP render pipelines is implemented using compute casting. So we utilize the same shader Unity use for rendering for optimization. It is sadly not as straight forward to give the shader code directly from Unity to Simplygon and we do some massaging behind the scenes as well as supplying all properties for the material.
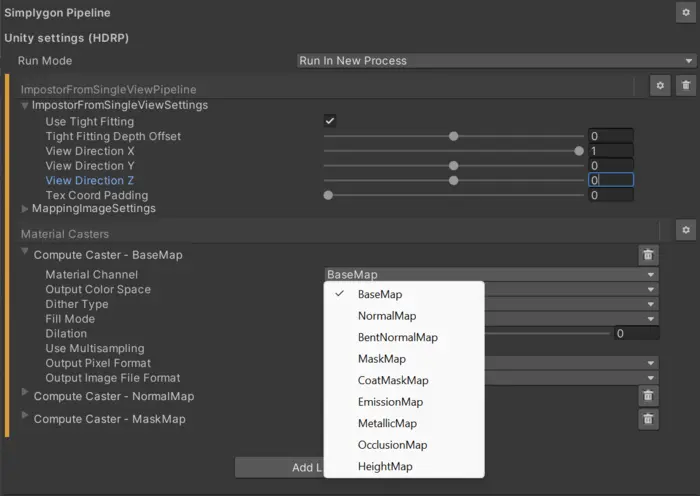
When we add a pipeline that uses material baking it will automatically detect which texture channels that is present in the object and add corresponding material casters. If we want to trigger this automatic detection again then we can click the gear icon to right of Material caster tab in UI and select Automatic.
We can also add material casters manually from this menu. In HDRP and URP we are not using the material casters we are used to, color caster, normal caster and so on. Instead we should pick Template → Advanced → ComputeCaster. We can then specify what material channel it should bake by changing Material Channel in it's properties. To our impostor pipeline we will case base map, normal map and mask map.
View direction controls the orientation of the impostor quad. To find correct view direction we can look at the orientation gizmo in our scene view. Here we can see that positive X-axis matches the camera angle we want our impostor in.
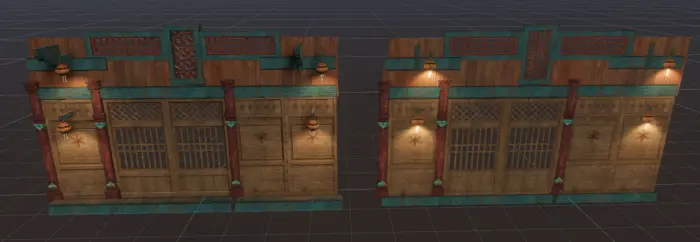
After processing the asset we'll get a quad and a material with our asset projected to it. The black border is because the generated material does not have alpha clipping enabled.

To solve this we enable alpha clipping on the material. That impostor from single view needs to use alpha clipping is one thing to keep in mind for performance. Depending on platform, and how much of the mesh area is clipped out, alpha clipping can be costly.
After enabling alpha clipping our impostor looks much better.
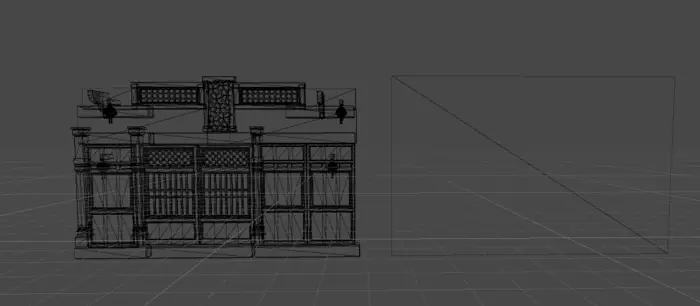
If we look at the wire frame we can see that we have a very low poly asset.
We have baked 3 textures; base map, mask map and normal map to use in the HDRP render pipeline.
LODGroup
We will now look into putting it all together in a LODGroup. To our original asset we add a LODGroup component. We then parent all generated LODs to our original asset, as well as cleaning up USD components generated by the USD importer.
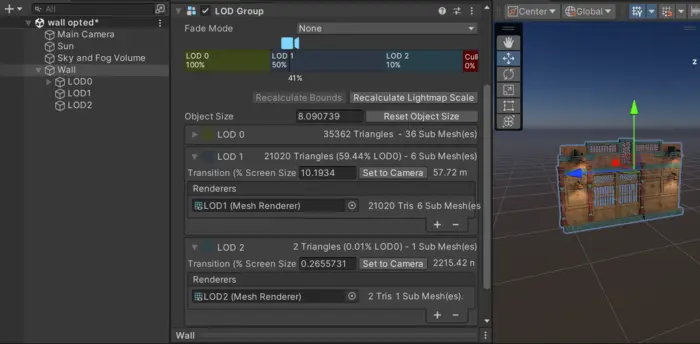
We can then assign our reduced LOD1 to LOD1 and impostor LOD2. We will switch to LOD1 at 50% screen size. Visual inspection gives that at around 10% screen size we can not see difference between original and LOD2, so we use that. We also assign our original meshes to LOD0.
Minimize LOD popping with cross fading
Up to now we have just switched between the different lod levels. If this switch is noticeable it is called a LOD pop. This is not something we want in our game. Let us look into ways of minimize this.
In Unity we can cross fade between different LOD levels. This is enabled by setting Fade mode to Cross fade in a LODComponent. We can control how long this transition should be with fade transition width per LOD level. Fading between LOD levels makes it hard to see a visual pop when we switch, it is more gradual. To see how it works let us create an example. Here we switch to our impostor LOD at 35% screen size and have a fade transition width of 0.3. We also tinted the impostor red so we can see what happens.
Cross fading between different LOD levels allows us to hide LOD pops. This also enables us to switch to LOD levels earlier then if we would use no cross fading. Let us see if we can move the transition of LOD1 so we switch to it earlier, as well as optimize it more. Let us switch to it at 75% screen coverage, as well as allowing up to 3 pixels of difference. This would give us a target screen size of 1080 * 0.75 / 3= 270 pixels. We optimize a new LOD1 and assign it to the LODGroup.
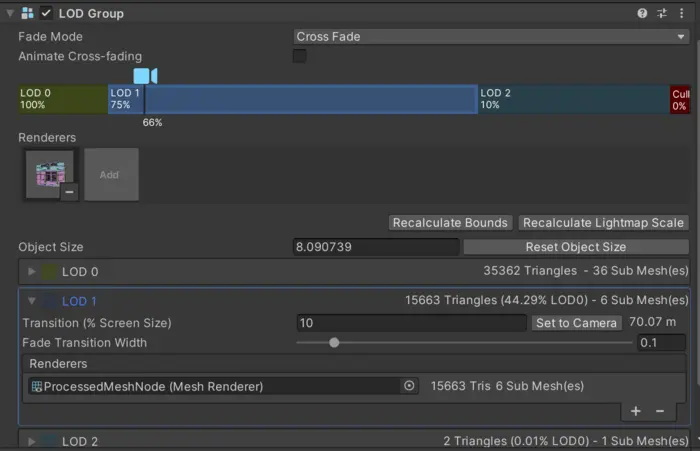
There is a cost associated with rendering cross fading LODs. So we only want to use this when needed and only use as short fade transition width we can get away with. After visual inspection we can see no LOD popping when switching to LOD1, even after increasing the reduction of it. We have a LOD pop when switching to LOD2 so we want to use cross fade to hide it. Notice that this is set in the panel of the previous LOD level, so we set LOD1's fade transition width to 0.1 to control the transition from LOD1 to LOD2.
Result
Here is a video of our two different tries to generate LODs compared to original asset.
In both cases we can not see switch from LOD0 to LOD1. But we secondary try switches earlier and to a much more optimized mesh. So we should get better performance.
First try have a noticeable LOD pop when we switch to from LOD1 to LOD2. Our secondary try uses cross fading to hide the transition so it is much harder to see when it switches.
Another thing noticeable in the video is when we switch to different shadow cascades. So this is something we should look into as well.
First try
| LOD level | LOD Switch | Triangle count | Submeshes | Materials |
|---|---|---|---|---|
| LOD0 | - | 35k | 36 | |
| LOD1 (520 pixels) | 50% | 21k | 6 | 6 |
| LOD2 | 10% | 2 | 1 | 1 |
Second try with cross fade
| LOD level | LOD Switch | Triangle count | Submeshes | Materials |
|---|---|---|---|---|
| LOD0 | - | 35k | 36 | |
| LOD1 (270 pixels) | 75% | 15k | 6 | 6 |
| LOD2 | 10% | 2 | 1 | 1 |
With Simplygon 10.2 adding support for Unity's HDRP render pipeline we can use material baking to generate very optimized impostors. These impostors are perfect when we want to optimize draw calls in our scene, or have meshes with geometry that is tricky to reduce. Having these optimization tools in our game engine allows us to optimize scenes and prefabs efficiently, letting us push graphic quality on all platforms without sacrificing performance.